Composting — Making Your Own Black Gold

Apr 08, 2017

While it would be nice to be able to make our own oil and save on fuel costs, the black gold in this case is compost. Compost is a valuable soil amendment, improving the structure of both sandy soil and clay, and providing a neutralizing effect on acidic or alkaline soils. Compost is also a source of the nutrients that your plants need to thrive. If all that wasn’t enough, you have the satisfaction of helping the environment, by using the vegetative waste from your kitchen and garden. 

  • compost wooden bin

    City skyline

    Photo By: John Doe
    Button
  • What is composting and how do we go about creating good compost?

    Composting is the process of decomposing organic matter to make a fertilizer and soil amendment. The decomposition is done primarily by aerobic bacteria, which are bacteria that need oxygen to survive. Worms and fungi play a part in the later stages of the composting process, but aren’t the primary workers. A pile of organic material will eventually decompose if left for a sufficient amount of time, but for most gardeners, especially those in urban areas, quicker results are preferable. Nobody wants a big pile of rotting vegetation sitting around forever! So if you’ve got a pile that’s been sitting through the winter now is the perfect time to give it a bit of attention before the busiest part of the spring begins. Your mission, should you choose to accept it, is to create the ideal conditions for bacteria to thrive and work their magic. This requires only 3 things, air (oxygen), water, and food. 

    First let’s deal with air.

    As a compost pile sits, the material compacts and air is forced out. There are a couple of ways to aerate the pile. You can turn over the whole pile transferring it from one area to another using a garden fork or shovel, depending on how small the material has become. While transferring, it’s also beneficial to try and mix up materials from the outside to the inside and vice versa. The inside of the pile will generally have more activity and break material down quicker, so mixing the material helps it decompose evenly. The second method, which is even easier, is to poke holes in the pile. This can be done with something as simple as a strong stick or piece of rebar, or you can invest in one of the tools available specifically for this purpose. Whatever tool you choose, work it around a bit to create the largest possible air space. 


    The second requirement for healthy, active bacteria is water.

    In the spring with piles of fresh material available from our garden clean-up, this shouldn’t be a limiting factor; however, in the summer the pile may need to be watered occasionally or covered to prevent excessive evaporation. Don’t be too enthusiastic with the water, the pile should seem spongy, not soaking wet. 


    Thirdly, those hungry bacteria need food, which is the material you add to the compost pile.

    While most things will compost there are a few guidelines to keep in mind. Don’t put diseased vegetation in the compost pile. You want to produce good quality compost, not spread disease throughout your garden. Weed seeds are generally killed by the composting process; however to play it safe don’t compost weeds that have gone to seed. In addition, meat, bones, or dog or cat waste should not be included. What kind of materials should go in? There are two general categories: carbon based materials, often referred to as “browns”, and nitrogen based material referred to as “greens”. Browns include items such as dried leaves, sawdust, wood chips and straw. 

    Greens are kitchen scraps, coffee grounds, fresh grass clippings, fresh animal manure from vegetarian animals. Yes, some of these items are brown, but in compost terms they’re green. Shredding or chopping the larger pieces before adding it to the pile will speed up the process of decomposition. The mix of browns and greens is important, as too much brown material may result in slow decomposition while too much green can make the pile smell. Guidelines vary, but the general rule of thumb is to aim for a ratio of 20-30 portions of brown material for every portion of green material, ideally added in alternating layers. 


    So you think you’ve done everything correctly, but how can you tell for sure?

    A working compost pile should be warm, about 135 degrees F or 58 degrees C. Thermometers made specifically to check this are available. If the compost pile is cold or starts cooling down something needs to be adjusted. There may be insufficient air, too much or too little water, or perhaps you have been overenthusiastic with “brown” material. Whatever the problem, examining your compost pile will tell you which one it is. Maintaining these elevated temperatures for as long as possible not only helps break down the material faster, but should kill off any stray weed seeds that have made it in to the pile. 

    Are we there yet?

    Compost is ready to use when it’s no longer possible to identify the material that went in to the pile. It will be completely broken down, and it will no longer heat up. Worms, which were previously kept out by the high temperatures, will start making their way to it. If your compost meets these tests, let it sit just a little bit longer to be sure then give your plants a treat. They will thank you for it. 


    Prepared by Master Gardeners of Ontario Education Resources and the Grey County Master Gardeners for use by home gardeners & community groups. For other use, please email greycountymg@gmail.com


    April 2017 bd 

    ²http://www.leevalley.com/en/Garden/page.aspx?p=10028&cat=2,33140&ap=1 


    Categories


    All Blog Posts

    Latest Blog Posts

    by Jennifer Deeks 17 Dec, 2022
    By Courtney Brull
    18 Feb, 2021
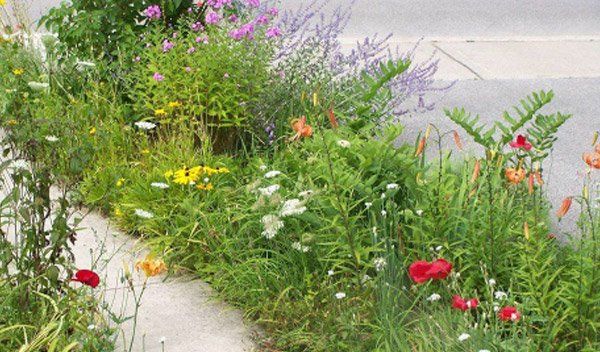
    It’s interesting to think of a garden as the place where nature and culture meet, maybe where they overlap. What we plant, what we think is attractive, how we think about land ownership – these all come from our culture. It is becoming more and more apparent however that our culture is having a devastating impact on nature. We are witnessing an alarming rate of species decline – both plant and animal - in part because we are losing so much of the habitat that “nature” requires for survival. When we add to this the stress on plants and animals brought on by climate change, we are seeing that nature is in trouble. This may require us to look at our gardens differently. Rather than looking at our garden or yard as a bit of the earth that we own, and can do with as we like, what if we were to acknowledge that our gardens are a part of nature – not separate from it at all? What difference would that make? Ecologists describe the parts of an ecosystem as having different functions. Often these functions are related to the needs of human beings. Our ecosystem filters our water, cleans our air etc. Different parts of an ecosystem – say, the plants – also have different functions related to other parts of the same system. If we see our gardens as a part of the larger ecosystem around us would we plant different plants? In addition to how pretty a plant looks in our garden, could we also consider what the function of this plant might be? If the plant had to have a function- such as providing pollen for a bee’s breakfast, or a nesting place for a bird, or some leaves that a caterpillar would eat on its way to becoming a beautiful pollinating butterfly – what difference would that make? Many ecologists are now saying that it would make a big difference. Some say that it would make a crucial difference. There are thousands of acres of privately owned land in Canada that could provide natural habitat to many stressed or endangered species. An American ecologist, Doug Tallamy, is promoting the establishment of “HomeGrown National Park”. A Canadian initiative – IntheZone Gardening from Carolinian Canada and the World Wildlife Fund describes the linkage of natural areas through connections and corridors created by home gardens. One way to begin to think of one’s garden this way is to think of Keystone species. These are species of plants that are especially important to the ecology of a certain area. They are like the keystone of an ancient arch – the stone that keeps the whole thing from falling down, though in nature it may not be quite that simple. Establishing the Keystone species for a particular eco-zone is a complicated process and not without its controversies. These are the species known to be important in the ecology of Grey Bruce: (no doubt this list is not complete) Trees : Oak, Willow, Native Cherry, Birch, Aspen, Poplar, Maple and Cedar. rent source.
    graphic of watered and wilted plant
    15 Aug, 2020
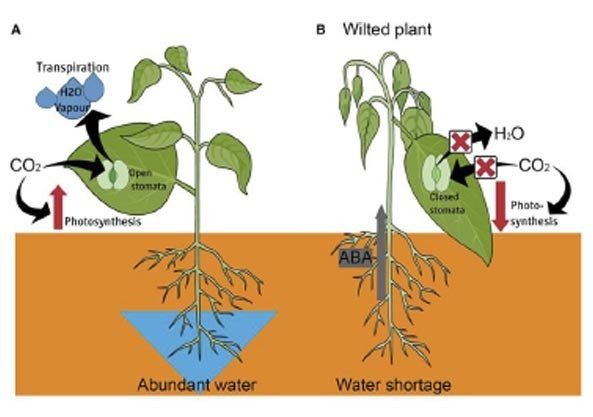
    We all want lush, vigorous, healthy gardens, lawns and planters, but how much water do we really need to apply to achieve our goals? How much is enough water, without wasting our precious resource? Water requirements depend on many factors: Is the soil sandy or clay based; does the garden have a layer of mulch to help retain moisture; has compost been applied yearly to add moisture retention for sandy soil and add porosity to clay soils; is the flora planted, appropriate for the soil type; are the plants drought tolerant or water guzzlers? A garden and lawn require, for the most part, (depending on the plant choices and soil type), approximately 1 inch of water per week for the water to percolate to a depth of 8 to 10 inches. This encourages a deep, strong root system for plants that will be able to withstand drought conditions and heat waves. Also, plants with deep roots are healthier plants that will be better able to deter pests and disease. When using a sprinkler system to water, try laying an empty tuna can on the ground to determine when you have reached the 1-inch water required. When watering by hand/hose, 30 seconds per square yard is usually sufficient. Shallow watering creates a root zone close to the soil surface in which plants become easily stressed during drought or heat waves. During these difficult conditions, watering may need to be increased, but first check the soil’s moisture level. The time of day when you water is important. Try to water in the morning, between 5:00 a.m. and 10:00 a.m. when the sun is not as strong, giving time for plants to dry. This will allow water to penetrate the soil and not be evaporated by the hot, mid-day sun. It will also reduce the risk of sun scald on the foliage. If watering in the morning is not an option, wait until about 4:00 p.m., making sure there is still time for the leaves to dry before night fall. If you must water at night, try to only water the soil, as wet leaves encourage diseases such as powdery mildew. If watering at high sun is your only option, it would be best done by applying water to the root zone via a soaker hose. We want to be as effective as possible when we are watering to conserve this precious resource. Check the soil first by inserting a finger. If it is dry up to the second knuckle, watering is needed. If the soil is moist just below the surface, hold off watering. When watering overhead of plants with large leaves, the water can slide off the leaves far away from the root zone... like an umbrella being held over the plant. We call this the “umbrella effect”. Delivering water to the base of plants encourages deep roots and is especially important for establishing new plantings. Leaves themselves take up very little water, so watch out for possible obstacles directing the flow away from the root zone. Container gardens are a closed system. They are not part of your regular garden’s eco- system and do not have the benefit of surrounding soil moisture and nutrient conditions. They need special consideration for proper maintenance. The smaller the container, the more frequently it will need watering during heat waves and drought. This might mean checking your small pots several times a day during stress times. Larger containers, on the other hand, (from 12-inch diameter and up), usually require less work and may require watering only every other day. Regardless of size however, it is a good idea to check all containers for sufficient moisture each day. When watering, ensure that you see water draining from the bottom of the pot and that the entire growing medium is wetted thoroughly. Frequent watering flushes away nutrients so your containers will need fertilizing for optimum performance. Remember to feed regularly with an NPK balanced product per package instructions. Flora prefers water temperatures close to what they would receive naturally in a rain event. If you are able to water using rain barrels or containers that have been left out to come up to air temperature, it is a great way to water. (Water from a hose can be shockingly cold). If you are able to give natural rain or well water as opposed to city water, this is all the better for your plants as it won’t contain chlorines and other possible chemicals.

    Share

    Share by: